Wednesday, April 20, 2011

Chicken & Lentils...

Umm... helloooooo goodness! Loved this new recipe I tried- VERY tasty, full of flavors, and something fun to change things up a bit. I know you will love it too! You could easily make this recipe without the chicken if you are vegetarian or if you want to serve it as a side dish, but it's also delicious and filling as the main course... give it a whirl!

Ingredients:
1 TBSP expeller pressed coconut oil
2 cloves garlic, minced or finely chopped
1 sweet onion, chopped
2 carrots, chopped
1 cup lentils
1.5 cups chicken broth
2 chicken breasts
1/2 tsp dried basil
1/2 tsp dried rosemary
10 oz. tomato sauce
1 TBSP fresh lemon juice
s & p
Soak your lentils for at least a 1/2 hour (up to 2 hours)
Sautee your onion, carrots, and garlic

Brown your chicken breast pieces

Everything cooking together!

Directions:
Soak your lentils in a bowl of water for 1/2 hour prior to the meal (which means you can start soaking and then do all your chopping and they will be ready to go). Add a little oil to your pan and brown your chicken breasts for 3-4 minutes per side. I cut my chicken breasts in half lengthwise, then in quarters (so 8 pieces total) and season it with s & p. Once the pieces are browned, but not completely cooked, remove them on a plate and set aside. Then add another drizzle of oil and your chopped onion, carrots, and garlic. Saute for 3 minutes. Drain your lentils and add them to the pan, along with your chicken broth and seasoning. Cover and cook that for 10 minutes, then add your chicken breasts back along with your tomato sauce & lemon juice and cover & cook for another 10 minutes stirring occasionally. Add up to 1/2 cup of water to it if it seems to thick for your preference, or leave it as is. Serve by itself or with a crips, green salad. Enjoy!

Spice it up?? For a different flair, replace the 1/2 tsp dried rosemary with 1/2 tsp of cumin.

Monday, April 18, 2011

Simple Smoothies...

I would like to dedicate this smoothie to my little friend Charlotte, who can detect kale in a smoothie from a mile away :) Ain't she precious??? This one's for you Charlotte... free of any kale (but loaded with spinach! :)
This is a really "kid friendly" smoothie, with just 3 fruits- and of course some greens snuck in there.... but you don't need to mention that to the recipient! Recently I did a post on Calcium and Vitamin D and the importance of getting essential vitamins and minerals into OUR diets and those of out kids.... so if you have a picky kid who doesn't like veggies.... try this out, and let us know the results! The recipe below will make enough for 1 sippy cup and 1 large glass for an adult or 2 sippy cups and 1 medium glass for an adult.


Ingredients:
1 banana
2 small oranges or 1 large
1 cup fresh strawberries
2 large handfuls of spinach
3 TBSP flaxseed
1 TBSP chai seed
6 cubes of ice
1/3 cup of coconut water (or juice if you need more disguising!)

Directions:
Dump all the ingredients into your Vitamix or blender and blend!


TIPS FOR KIDS: If your kid turns up their nose at a green drink- try adding 1/2 cup frozen blueberries, it will help change the color from green to purple!!! Also... try putting it in a cup that's not see-thru.

Wednesday, April 13, 2011

Lemon Honey Chicken.....

Oh MY goodness... this is DELICIOUS! Honestly, I have been on the hunt for some yummy new chicken dishes, and this one is a CHART TOPPER!! I am thinking it might be my new go-to, last minute meal, maybe incorporated on a weekly basis... it was SUPER good and SUPER simple!

Ingredients:
4 TBSP fresh lemon juice
2 TBSP honey
1/8 cup expeller pressed coconut oil
1 tsp dried Oregano
1/2 tsp salt
1/2 tsp pepper
2 cloves garlic, minced

chicken browning in the skillet

before going into the oven

finished product after the oven!

Directions:
I used 2 large chicken breasts and sliced them in half and then in half again then I put them in a large ziplock bag and mixed the marinate together and let it refrigerate for an hour (you can do 1-2 hours, but chicken really shouldn't marinate for longer than that). Then I poured the whole bag into my skillet and browned the chicken by letting cook for about 4 minutes on each side. After that I scooped it up and put it into a pyrex dish and popped it in the oven for 20 minutes on 400. It was flavorful, moist, juicy... just wonderful!

I served it with Parmesan Parsnips (fabulous!) and Sauteed Squash (another staple in our house!)

Monday, April 11, 2011

Almond & Apricot Bark


Ummm... do you need a chocolate fix? Wait, I know what you are going to say.... I start a lot of posts with that exact same line! Do I love chocolate?? YES I DO! And the darker the better for me... none of this milk chocolate business!

Here's a quick fix to needing a little pick me up in the middle of the day- or if you are feeling generous with your chocolate, make a batch, break it up and fill a jar with it- it would make a great gift for a hostess for Easter or a birthday friend who deserves a little crunchy goodness! The bad news, it's so good you will want to eat the WHOLE BATCH! The good news, you can try to tell yourself it's almost as healthy as a vitamin- I mean come on- dark chocolate, almonds, and apricots.... that's almost comparable to a vitamin, right??! :)

Ingredients:
1 cup dark chocolate, at least 60% cocoa
3/4 cup chopped raw almonds
1/2 cup chopped dried apricots

Directions:
Melt your chocolate in a double boiler or a glass dish in your microwave. Add your chopped almonds and apricots. Stir well and pour out onto a cookie sheet lined with parchment or wax paper. Put in the freezer to harden. Remove and break into pieces, sneaking some for yourself as you fill your jars. I keep mine in the fridge in an air tight container so it stays crunchy and fresh.

EXTRA CHOCOLATE??? Dip some whole dried apricots in your melted chocolate and place them on a parchment lined plate, into the fridge to harden and you have a quick dessert!

Friday, April 8, 2011

Santa Fe Salad (Revised)

This is a great recipe that was in desperate need of some update photos... so the salad is not revised, just the blog post! Yet another delicious, nutritious salad for your dinner table!

Ingredients:
Head of Romaine
chicken breast (I use 1/2 per person)
1 can black beans
1 ear of cooked corn (frozen/can will work)
1 avocado
1 tomato
1/2 red onion, thinly sliced
1/4 cup jack cheese
1/4 cup cheddar cheese
1/4 small jicama, diced * optional
crushed tortilla strips

Dressing: You can make your own by mixing ranch dressing with some heaping spoonfuls of salsa or use your own favorite, a lot of times I revert to my staple balsamic which, of course, works well on this too!

Seasoned and Shredded Chicken from the Crock pot
(see "Time Saving Tips" below)
BBQ sauce added to the shredded chicken
Adding the veggies, beans, and chicken
All mixed up!
Directions:
*If you are going to cook your own corn, start boiling your water. Then brown your chopped chicken breasts with a little bit of lemon pepper seasoning OR salt & pepper and a little BBQ sauce (my fav). Set that aside. Drain and rinse a can of black beans. Chop your salad, tomato, and red onion. Pull your corn out and cut off the kernels. Shred your cheese, use what you have if you don't have or won't both, do what works for you! Dice some jicama and avocado last, then top with crushed tortilla chips and dressing and enjoy!

TIME SAVING TIP: I also use shredded chicken in this recipe which I cook in my crock pot. I will put 4 breasts in the crock pot, add a splash of water (and usually s & p & garlic powder) and then cook them for 6 hours. When they are done, I shred them and separate it for different meals that week. Ideally I store it in the fridge if I am going to use it in the next 2-3 days, but if not you can freeze it and use it later. I find when freezing it, it's better to have some "liquid" on the chicken to prevent drying out- so add your salsa or BBQ sauce BEFORE freezing- but use it fresh if you can. I For instance, might use 1/3 of it for this Santa Fe Salad, 1/3 for Chicken noodle soup, and the other 1/3 for BBQ Chicken Pizza or Tostada Pizza.... always thinking ahead on ways to save some time in the kitchen!

Vegetarian- Simply remove the shredded chicken and double the beans!

Thursday, April 7, 2011

Calcium and Vitamin D

I am doing it. I need to step up on my Soap Box for just a minute, I promise it won't be long... if you don't want to read it, close the tab, I am not offended.


So I found this latest article by Dr. Fuhrman very interesting and really wanted to share it with others, hence my copy and paste job to my blog. I find it so interesting, especially as a mom of young children, that calcium absorption can actually be BLOCKED by too much salt, caffeine, animal products, and SUGAR in our diets... Sometimes (actually, often) I get razzed/made fun because I monitor my child's intake of sugar and I don't allow her to indulge in it everywhere we go- but then when I read studies like this, I am affirmed in my decision to continue to monitor it and be okay with denying it (for her and for me) throughout the day. If I DO ACTUALLY get adequate greens in her diet, then I don't want to go overboard and dump all these "other things" in her system that will end up blocking the absorption of the vitamins and minerals that her body NEEDS to stay healthy. Again moderation and balance is my goal, I am in no way advocating nixing it all out...


Also, I wanted to point out HOW IMPORTANT it is to be eating vegetables, and how important it is for our children to be eating GREEN VEGETABLES.... did you see the part that states "32% of calcium is absorbed from milk, whereas 50 % of calcium is absorbed from green veggies".... that's a BIG DEAL.... we should be just as concerned (or even more so) that our kids are getting veggies in their diets as we are milk.... not to mention all the other wonderful health benefits that veggies bring. I could go on here, but I am trying to contain it.


So, are you thinking, "my kid doesn't eat veggies so now what???" Well, let's learn and share our ideas with each other. Let's open it up, how do you get your kids to eat veggies... Do you serve them first before they are allowed anything else on their plate? Do you mix them in smoothies?? (if so check out this recipe). Do you not allow them dessert until their veggies are gone?? Are you eating them as an example?? Or, do you just have then angelic children that ask for more broccoli please??? :) Share with us your wisdom... and read the article too! Leave your thoughts and insight PLEASE!!!

Ok, I will step down from my soap box now.... read it for yourself:

Calcium, Vitamin D, and Osteoporosis
About 10 million Americans already have osteoporosis, and 34 million are at risk.1 Contrary to popular belief however, low intake of calcium is not the primary cause of osteoporosis. While Americans have the highest calcium intake in the world, we also have one of the highest hip fracture rates in the world.2The standard American diet causes much of the consumed calcium to be lost in the urine. Excess salt, caffeine, sugar, and animal products leach calcium out of bones and promote urinary calcium loss.3The Nurses’ Health Study followed 72,337 women for over 18 years and found that dairy intake did not reduce the risk of osteoporosis-related hip fractures.4

In contrast, vegetables, beans, fruits, nuts, and seeds are rich sources of calcium and other important minerals, and do not promote the urinary excretion of calcium. A three cup serving of raw, chopped greens – like kale, bok choy, or collards – provides the same amount of calcium (or more) as one cup of whole milk. Only 32% of the calcium in the cup of cow’s milk can be absorbed by the human body compared to about 50% for many green vegetables.
5

Calcium isn’t the only important nutrient for bone health

It’s also important to keep in mind that the effect of nutrition on bone health is more complex than just getting adequate calcium. For example, vitamin K also supports bone health, and vitamin K is abundant in leafy greens.
6 Of course, vitamin D also plays a critical role in regulating bone health. Vitamin D promotes the absorption of calcium in the intestine as well as the activity of bone building cells. Medical studies show vitamin D is more effective than calcium for treating osteoporosis.7 The most natural way to obtain vitamin D is through sun exposure, but because of indoor jobs, our climate, and skin cancer risk it is virtually impossible to achieve optimal levels of Vitamin D from sunshine alone. Vitamin D supplementation is necessary for most people.

How much calcium and Vitamin D are necessary to protect against osteoporosis?

Most Americans take inadequate amounts of Vitamin D and excessive amounts of calcium. Approximately 50% of Americans are deficient in Vitamin D.
8 For optimal bone protection, I advise having a blood 25(OH)D test, and then supplementing accordingly to keep Vitamin D levels in the range of 35-50 ng/ml.9,10 If you have not had yet your blood tested, 2000 IU is a reasonable daily dose to start.

Wednesday, April 6, 2011

Quick Garlic Tip...


Here's something that I usually keep on hand for those times when you run out of garlic, forget it at the store, don't have time to mince your own, or realize yours is growing green unwanted sprouts :)

This is the greatest little invention, they sell frozen Garlic Cubes as well as cilantro, basil, and parsley in little tiny ice-cube-like-trays. I pick mine up in the frozen section at Trader Joe's, but other markets carry them as well. There are some dishes where fresh is still best, but for others like soups, crock pots, and other warm entrees, these do the trick quite nice! Just a tip for you this Wednesday to help simplify your time in the kitchen!

Tuesday, March 29, 2011

Apple Spice Muffins


Ummm, do I have a new favorite muffin?? Maybe. I ate 3 the night I made them. They lasted a total of 24 hours in my house. They were a hit with everyone who tasted them. They remind me of what would happen if a spiced cupcake met apple pie.... yummmmmmmm........ that good :)

Ingredients:
2 cups flour (I used 1 cup all purpose, 1 cup whole wheat)
1 tsp baking powder
1/2 tsp baking soda
1/2 tsp salt
1 tsp cinnamon
1/2 tsp nutmeg
1/2 cup coconut crystals or brown sugar
1/2 cup maple syrup
1/2 cup apple sauce
1/2 cup butter, melted
1.5 tsp vanilla
2 eggs, beaten
1 cup chopped apple
1/2 cup shredded apple
*** I used Granny Smith apples***

Topping:
1/4 tsp cinnamon
1 TBSP flour
1/4 cup brown sugar or raw coconut crytals
1 TBSP butter


Directions:
Preheat your oven to 375. In a large mixing bowl, combine all dry ingredients and sift. Then add your eggs, maple syrup, melted butter, apple sauce, and vanilla and mix well until all ingredients are blended. Lastly, add your apple, stirring well. Use lined cupcake tins and pop them in the oven. After 5 minutes in the oven, open the oven door and scoop the crumb some crumb topping on each muffin, close and let it cook for the remaining time. The WHOLE cooking time is 18- 20 minutes- they are done when you can insert a toothpick and it comes out clean.

Sunday, March 27, 2011

Veggie Chop Salad..

I really wanted to make a salad the other night to accompany our Mexican Lasagna, but I was out of lettuce--- but that didn't stop me! I thought, not every salad needs lettuce, let's think out of the box! This was a crunchy, satisfying alternative to the everyday green salad that I always make!

Ingredients:
3 large carrots, peeled & chopped
1 red bell pepper, chopped
4 stalks of celery, chopped
1 crown broccoli, chopped
1/4 cup raw sunflower seeds, toasted

Directions:
Wash and chop your veggies. In a small skillet, add a drizzle of Grape Seed oil and your sunflower seeds, stirring them around to coat them in the oil. Add a shake of sea salt and stir once more cooking over medium heat until they are browned and toasted. Add them to your veggie chop right before so they don't get soggy. Drizzle on the dressing and serve!

Monday, March 14, 2011

Homemade Hummus

Simple. Creamy. Flavorful. Effortless. Enough said.

Ingredients:
2 cans garbanzo beans
1/2 cup olive oil
1/4 cup lemon juice
2/3 cup tahini
2 cloves garlic
1 tsp sea salt
2 TBSP pine nuts
2 tsp fresh parsley
* 1/2 tsp. red pepper flakes if you want to heat it up!
Directions:
Dump it all in your Vitamix or blender and puree until smooth. Serve with pitas, crackers, vegetables, and more!!

Tuesday, March 8, 2011

Mexican Lasagna

There are a few dishes that I have tried over and over again in order to find the perfect combination to the perfect dish- and Mexican Lasagna is one of them... but I believe I have finally found THE recipe- a healthy combination that we all enjoyed over at my house! Hope you like it too!

Ingredients
1 pound ground beef or turkey
1 sweet onion, chopped
2 clove garlic, minced
1 can diced tomatoes
1 can black beans
2 cans tomato paste
1 cup water
1 cup frozen or fresh corn kernels
1-2 cups shredded cheese (cheddar or jack or combo)
1.5 tsp cumin
2 tsp. chili powder
1 tsp salt
1/2 tsp. pepper
12 corn tortillas, cut into quarters
cilantro for garnish

Directions:
Preheat your oven to 350. Chop your onion and mince your garlic and brown them both with a drizzle of Grape Seed oil in a large skillet. (If using beef, drain your fat). Then add your tomatoes, water, seasoning, beans and corn and mix well cooking for 3-5 minutes until everything is well blended. Get out a 9 x 13 glass dish, spray the bottom, them add some of your meat/tomato mixture in a thin layer, then add a layer of cheese, then a 4 of your quartered corn tortillas (the tortillas will over lap one another). Repeat so you have 3 layers on ingredients. Then cook for 15- 20 minutes. I turned my broiler on for the last few minutes to get the top of it bubbly and gooey. Remove from oven, garnish with fresh cilantro, cut into squares and serve!

This is a gluten free recipe!

Sunday, March 6, 2011

Maple Whipped Cream Frosting

OK, I desperately need to get to bed, but I also feel DESPERATELY compelled to tell you about this DELICIOUS frosting/whip cream I just discovered. Let me tell you a little secret.... I don't normally like frosting. I scrape it off of every cake (you should see my plate when I am done, it's kind of embarrassing with smooshed frosting everywhere!). I scoop it out the center of cakes and I avoid corner pieces and any piped decorations on top. I don't even like whip cream, I order my Starbucks drinks without, I scoop it off of any desserts that I get out in restaurants... are you getting the picture?? I really don't care for it AT ALL.... until that is, I found this recipe. It's actually worth putting on, maybe even using in excess. And guess what, it's super easy and made with maple syrup! Give it a "whip" you'll love it, I promise!

Ingredients:
1 cup heavy whipping cream
1/4 cup real maple syrup
1/4 cup softened butter

Directions
Simple. Add all ingredients to a bowl and beat with an electric mixer until peaks form (about 5 minutes or so) then put on top of cupcakes, pie, anything else that will stand still long enough- it's delicious!

...And next I promise to post something you can put it on... double chocolate cupcakes! Also made with Maple Syrup!

Friday, March 4, 2011

Tips for hosting a Party...

I love to throw parties, I love to have people over, I love to let my creative juices flow and have fun showing others so that they know I enjoy having them in my life! I think I might have inherited this from my mother. Here just a few ideas for some of your parties- big or small...

To add a splash of color to the bottom of your vases, thinly slice some citrus (limes, lemons, oranges, blood oranges, even grapefruit), it will give an extra pop of color and a pleasant aroma too!
Don't feel like you have to confine yourself to vases either, there are lots of fun holders for flowers, just start looking around your kitchen, garage sales, and the Good Will for fun and unusual finds! Like this...
and this...
Need a centerpiece for Easter coming up?? Grab a small wooden box or clay pot and grow some grass in it (great project for kids too!) Then add a small fluffy chick or fuzzy bunny to it- simple, inexpensive, and springy... And low enough for your guests to talk over.... don't you hate it when people move your centerpieces! (Sorry this isn't the best picture, it's always awkward to take pictures of other peoples centerpieces at a large BBQ!)

Another centerpiece of table decoration that's great for showers or events is glass jars full of colorful candy (which always seems to be snacked on throughout the event!) with homemade pinwheels poking out the top! These are great for kids and adult themes alike, they are a great way to incorporate colors and themes to any party.
How about making your own block signs?? Super simple. Cut a 2x4 into different size blocks, paint, and letter them with a message for your next holiday or season! These could make their way out for the 4th of July, Memorial Day, Veteran's Day and more!
Here is a picture of my dear friend Monica's wedding- it was SO beautiful I wanted to share it with you! The thing I loved about this was the way she used bright colors that contrasted each other so well- with the turquiose and yellow. Every table was a little different, don't confine yourself to making everything the exact same... and her attention to detail was awesome! Notice the clocks?? The only number on the clock represented the table number in order to let guests know where to sit... creative huh?? She made them with Target clocks and cardstock- super ingenious!
Here's a picture of my baby shower that my girlfriends threw for me when I was pregnant with my son- I LOVED every detail! The were really creative and went with a bird/nest theme... it's always fun & more interesting to chose a theme! Notice the wreath with the blue Letter "J" on it, the cake pops made like Robin Eggs, the cupcakes with shredded coconut to look like a birds nest, the birdie tags on the treats that read "A Tweet for YOU!". Choosing a theme can really tie a party all together!
Choose a fun topper for your cupcake stand! You of course can reserve the top of the stand for the cupcake with the candle on it, but why not top it with something creative like a flower, baby toy or mini bride... something out of the ordinary... again to help tie in the theme!
For tips on how to make your OWN EASY letters for on top of your next cake, check out these SIMPLE directions!
And here's a fun thought, give your guests something simple and fun to leave with- even big kids like party favors!
Consider this your virtual Party Favor... thanks for stopping by!

Wednesday, March 2, 2011

Tips on the Top 10 Kitchen Tools...

If you were to ask me to pick my Top 10 Favorite "Tools" for the kitchen, the things I use most (besides the obvious ones like a good set of pans, cutting board and sharp knife set), the things that are most versatile, the things I would take with me if I were stranded on a deserted island with an empty kitchen... here's what I would say :)


10. Garlic Press- I used minced garlic almost everyday in everything from marinates, to dressings, to main dishes and more- and there is no easier more convenient way to add garlic to a meal than with a good garlic press. Oxo, Pampered Chief, Crate & Barrel, and Williams Sonoma have great ones if you are in need of this essential.
Weber 6432 Silicone BBQ Accessories Style Silicone Basting Brush
9. A Silicone Basting brush. This is essential if you BBQ or use marinates frequently... I use to use the ones that looked like a paintbrush until it started shedding all over my food and grossing me out! These are a great alternative, dishwasher safe, and come in a variety of fun colors!
<span class=
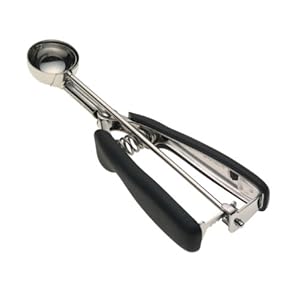
8. A Cookie Scoop. Do you bake?? Then this needs to be in your drawer- no questions asked. From cookies to granola snacks to scones to nutballs- this is a time saver! Not only does it quickly distribute your goods, but it helps to make sure they are all the same size for even cooking. OXO makes a small and large scoop, check them out!
<span class=
7. A Pastry Blender. Now, I know this is for pastries, so you can definitely use it when making baked goods like lemon bars and shortbread's, but can I fess up that I use it for so much more! I use it to squish my avocados for guacamole, for mashing bananas before they go into banana bread, for smashing my potatoes when making mashers... the list could go on and on- it's a great tool with many different uses when you think outside of the box!
<span class=
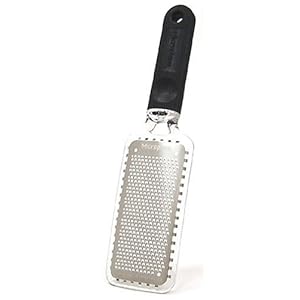
6. A zester. This is wonderful for not only zesting citrus, like lemons, oranges, and limes for marinates and dressings and chicken dishes, but it can also be used for Parmesan cheese and dried spices like cinnamon sticks. Add a fine sprinkle of grated goodness to your dishes.
2-in-1 Lemon and Lime Squeezer
5. A lemon/lime juicer. My favorite one is the hand-held squeezer that will allow you to squeeze the juice from a lemon or lime and add it to drinks, baked goods, marinates, dressings, guacamole and other dishes that call for a splash of citrus juice. A lot of times mine sits on a cutting board with half a lemon in it and I continually squeeze it into my water glass throughout the day to freshen up my water! The only time this tool isn't so cool is when your lemons are bigger than the tool... this happens to me at the end of the citrus season with our home grown Meyer Lemon tree.... so if you think that might be your case... then this would be my second choice for Tool #5:
5.5 A rounded cutting board and chopper. This was one of my favorite wedding gifts I received.... and I think it was purchased at Costco along with a giant cutting board- but they also sell them online and at specialty cooking stores. It is so wonderful for chopping nuts, dried fruit, and other small bits without them flying all over the counter. Check them out!
Chef N Corporation Palm Brush Palm Held Vegetable Scrubbing Brush
4. A Vegetable Scrubber Brush. This sits on my window sill and I am constantly using it to scrub carrots, potatoes, parsnips, and other root veggies and fruits too before eating them. An inexpensive find.


<span class=
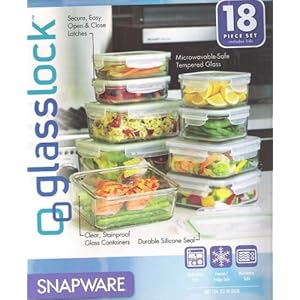
3. Glass Storage Containers. Honestly, these are the best thing EVER. I love them for so many reasons. They don't crack and age like plastic, they don't stain like plastic or obtain odors from foods, they are dishwasher safe, and OVEN safe (that's HUGE! That means if you have left overs one night, you pop them in this dish and the next day for lunch you take off the lid and put it directly into the oven (or microwave) to reheat.... easy peasy, time saver!) They sell a set at Costco and sometimes have a coupon for them as well, keep you're eye out!
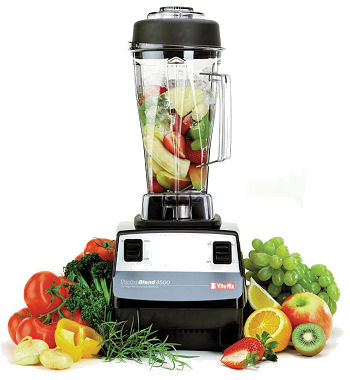
2. My precious Vitamix. I love this beast. It was by far the best investment ever (cuz they are an investment, I am not going to lie, they are a pretty penny- but worth every bit of prettiness!) I use this almost every day. I make hummus, ice cream, sorbet, smoothies, dressing, baby foods, sauces, and more. You can make your own rice cereal, puree tomatoes, grind oats, the list could go on and on. Need I say More?? cuz I can.... (If you are interested in getting one, call your local Costco and see when the Vitamix rep is coming because they travel from place to place selling them, then start saving those pretty pennies!)
<span class=
1. MY SALAD SPINNER! Honestly, Mr. Salad Spinner, where would I be with out you??? I will tell you where...I would be wasting a lot of time in the kitchen! I make a salad almost daily, and if not a salad - kale, herbs, Swiss chard or some other leafy green! There is no better way to wash, spin, and DRY your leaves for a crisp and crunchy salad or side. There is nothing worse than a soggy salad or watered-down dressing, so invest! Do not spend any more time blotting your leaves dry with a paper towel or whacking them against the sink! Make this your next addition to your arsenal of kitchen tools!

** I purchase some of these items online, or at Bed, Bath, Beyond (you can use a coupon for every item you buy!), some at Costco, and at other cooking stores.***